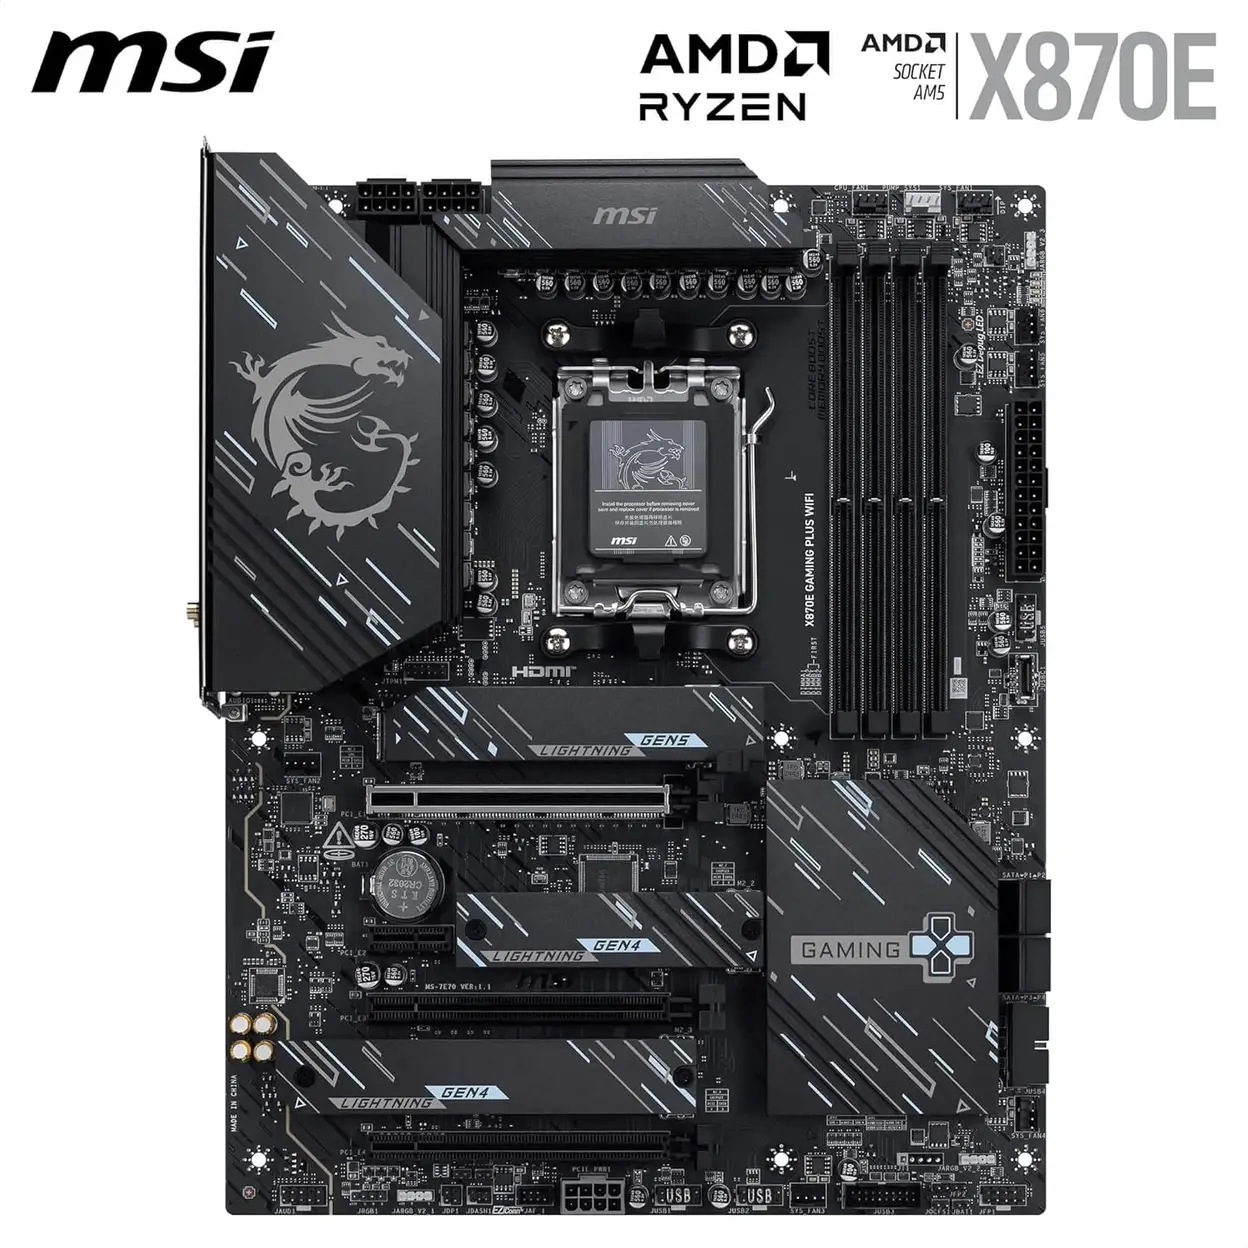

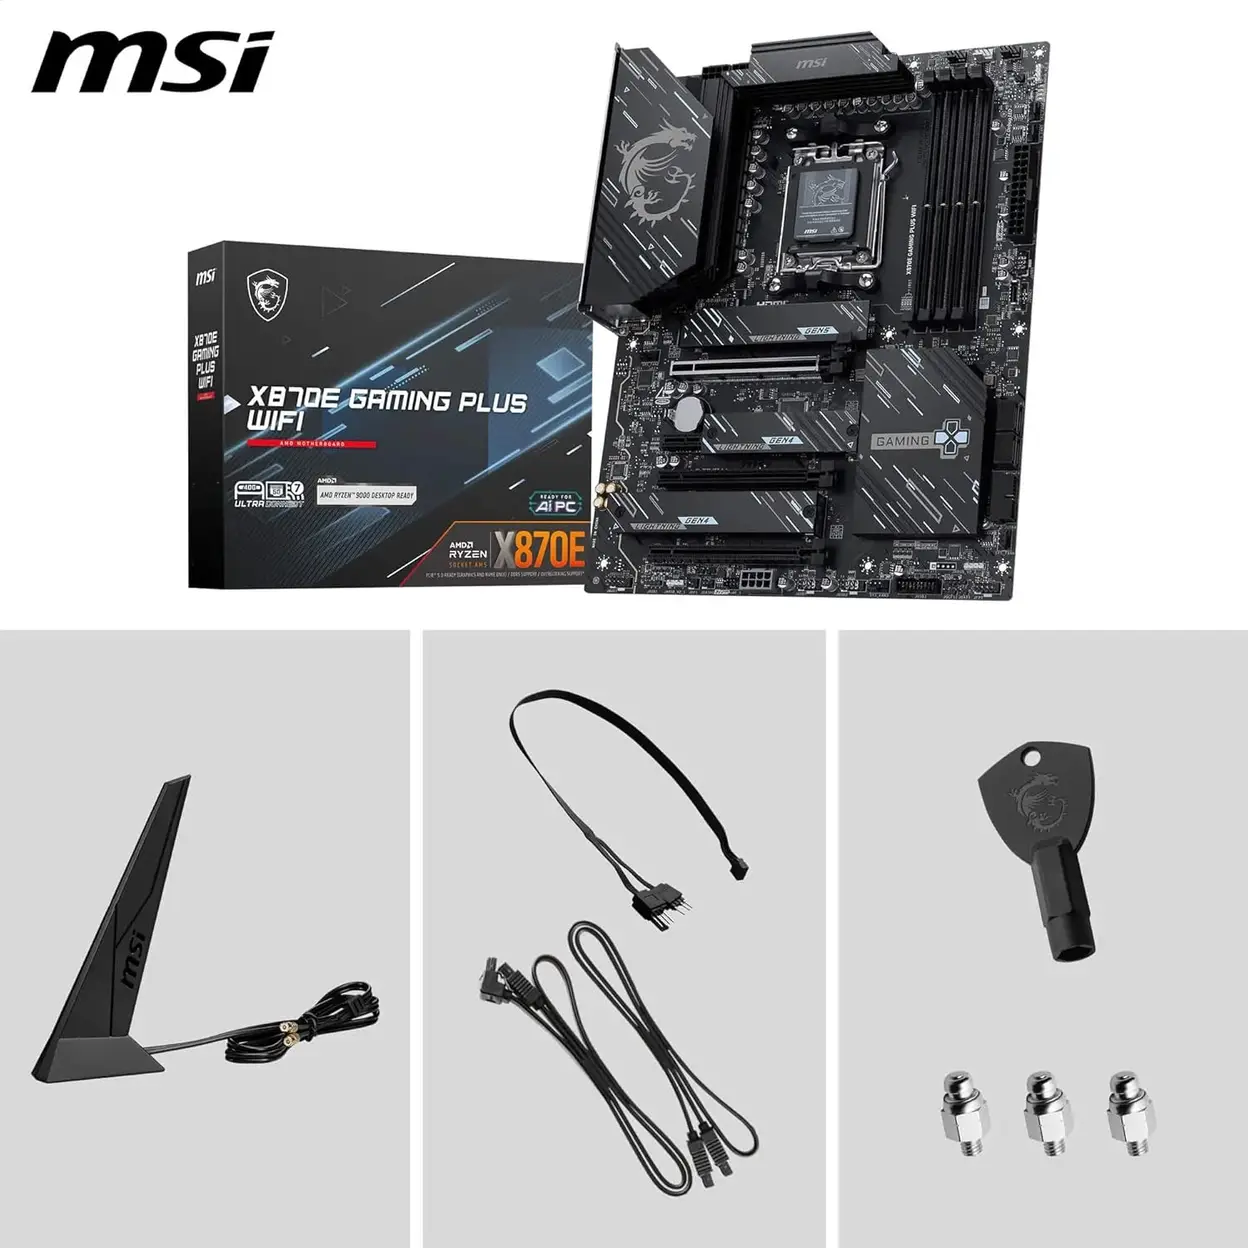
MSI X870E Gaming Plus WiFi Motherboard AMD X870E Socket AM5 ATX
Cool and technological style


X870E GAMING PLUS WIFI
Boost your gaming and computing experience with the X870E GAMING PLUS WIFI motherboard. Designed for AMD Ryzen processors, this ATX motherboard provides robust connectivity, high-speed memory support, and advanced audio features, making it ideal for gaming and professional use.
Key features
- Advanced Processor Support— Compatible with the latest AMD Ryzen processors, ensuring high-performance computing for demanding applications.
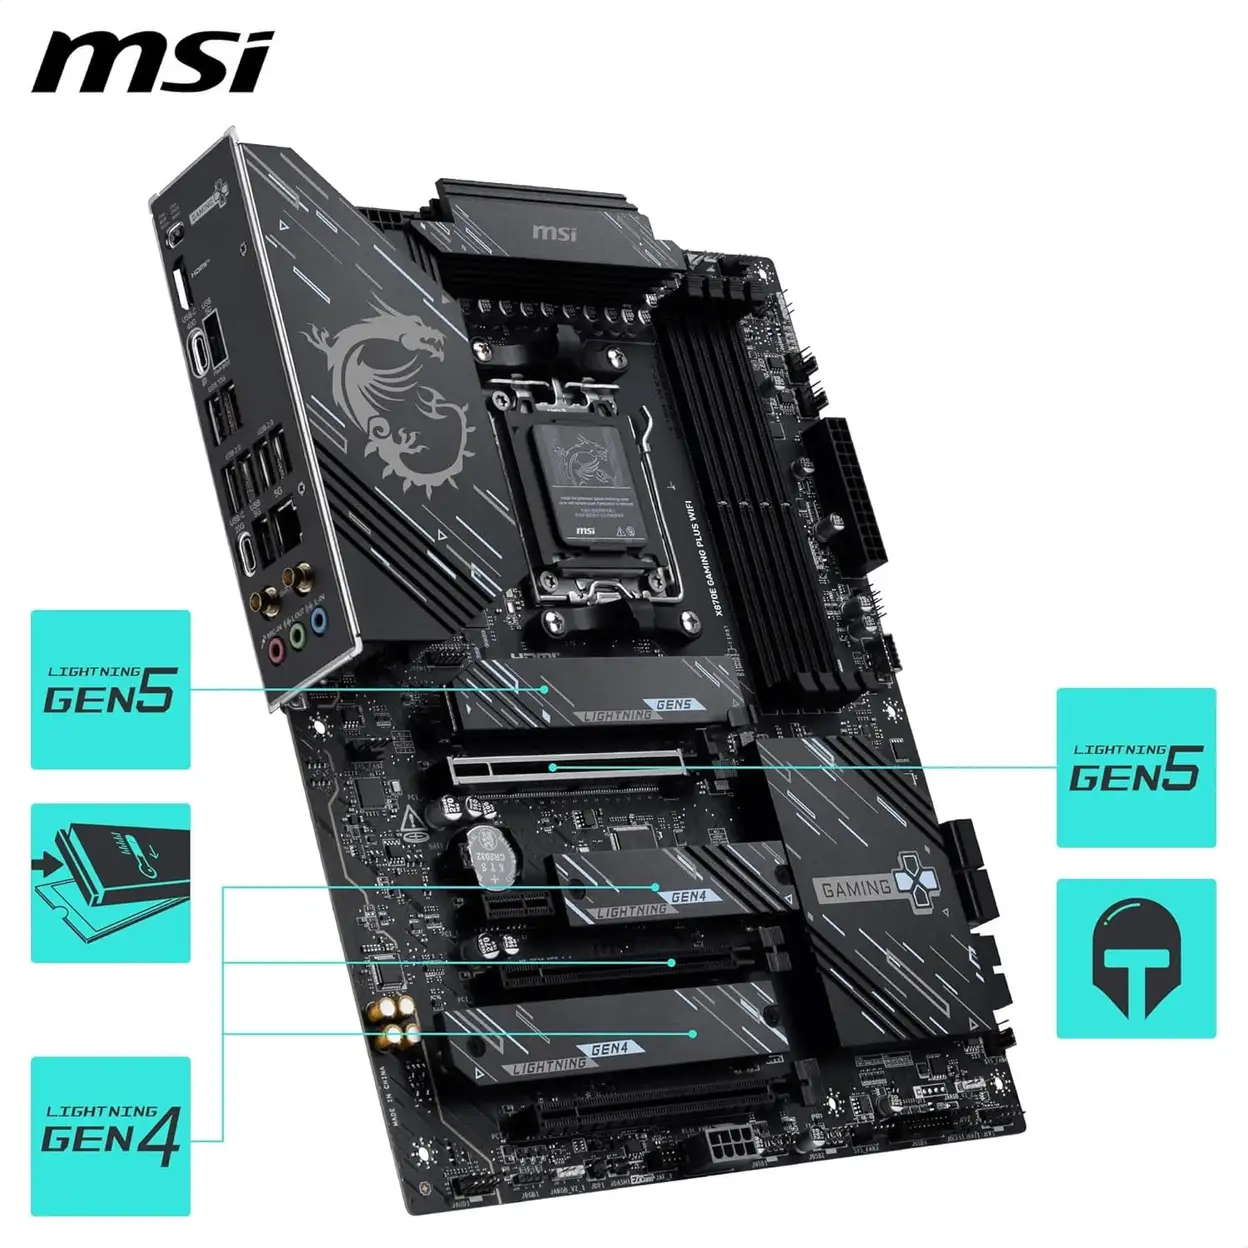
- High-Speed Memory and Storage— Supports up to 128 GB of DDR5 memory, with multiple M.2 and SATA connectors for flexible and high-speed storage solutions.
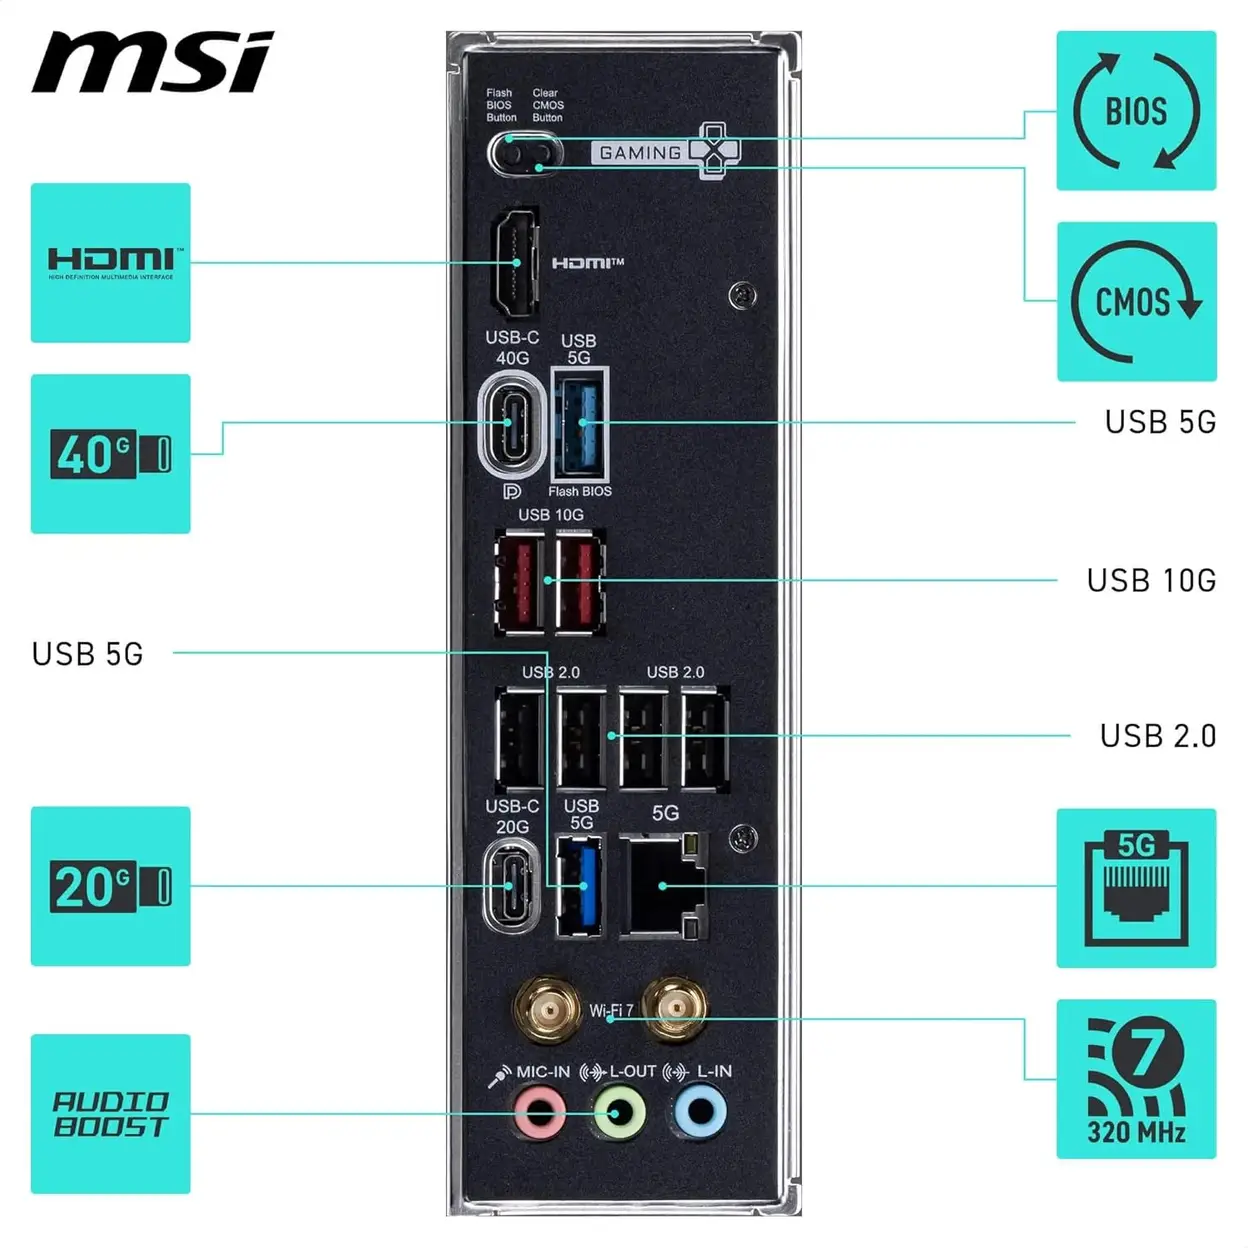
- Superior Connectivity— Features Wi-Fi 6E and Bluetooth 5.2 for seamless wireless networking, along with 2.5 Gigabit Ethernet for stable and fast wired connections.
- Comprehensive USB Options— Equipped with multiple USB ports, including USB 3.2 Gen 2x2 Type-C, for extensive peripheral connectivity.
- Enhanced Audio Experience— Integrated high-definition audio chipset delivers excellent sound quality for immersive audio experiences.
- Robust Build Quality— Built on the AMD X870 chipset, this motherboard provides stability and durability for intensive computing tasks.
- Future-Ready Expansion— Includes multiple PCI Express 5.0 slots for additional expansion cards, supporting advanced graphics and other components.
Ideal for
Gamers and professionals seeking a high-performance motherboard with extensive connectivity, superior audio, and future-ready expansion options for demanding applications and immersive multimedia experiences.
Redemption Instructions: https://cloudemea.msi.com/index.php/s/23SwXqiG4sHqpJy
Technical Specifications
| Specification | Details |
|---|---|
| Brand & Model | MSI X870E GAMING PLUS WIFI |
| Product Type | ATX Motherboard |
| Chipset | AMD X870 |
| Processor Support | AMD Socket AM5, supporting AMD Ryzen™ 7000 Series and future processors |
| Memory Support | 4 x DDR5 DIMM Slots, supporting up to 128GB |
| Graphics Support | 1 x PCIe 5.0 x16 Slot (with Steel Armor reinforcement) |
| Storage Interfaces | |
| Wireless Networking | Intel® Wi-Fi 6E Solution, supporting 2.4GHz/5GHz/6GHz bands, Bluetooth 5.2 |
| Wired Networking | Realtek 2.5G LAN Controller |
| Audio System | Realtek ALC4080 HD Audio Codec, supports Nahimic Audio Technology |
| Rear USB Ports | • USB 3.2 Gen 2x2 Type-C (20Gbps): 1 |
| Front USB Support | Supports USB 3.2 Gen 1 and USB 2.0 front panel connectors |
| Power Connectors | 24-pin ATX Main Power Connector, 8+8-pin CPU Power Connector |
| PCB Form Factor | ATX Form Factor (30.5 x 24.4 cm) |
Installation and Usage Instructions
Safety Preparation: Before handling, ensure the computer is completely disconnected from all power sources. Touch a grounded metal object to discharge any static electricity from your body.
Installing the CPU: Lift the retention lever on the AM5 socket. Align the triangle marker on the AMD Ryzen CPU with the triangle on the socket and gently place it in. Ensure it sits flush, then lower and lock the lever.
Installing Memory: Open the latches on both ends of the DDR5 slot(s). Align the notch on the memory module with the ridge in the slot and press down firmly and evenly until the latches click into place automatically.
Installing the Motherboard: Install the I/O shield into the case chassis. Align the motherboard's mounting holes with the corresponding standoffs in the case. Secure the motherboard using the provided screws.
Connecting Power and Case Cables: Connect the 24-pin main power cable and the 8+8-pin CPU power cable(s). Refer to the motherboard manual to correctly connect the case's front panel switches, LEDs, and USB/audio headers.
Installing Storage and Graphics Card: Install the M.2 SSD into its slot and secure it with the screw. Insert the graphics card into the PCIe 5.0 x16 slot and lock it in place.
Initial Power-On: Connect the monitor, keyboard, and mouse. After connecting the power, use the case's power button or short the "PWR_SW" header on the motherboard to turn on the system.
Installing OS and Drivers: Enter BIOS setup if needed, then install your operating system. Afterwards, download and install all the latest drivers from the MSI website, especially chipset, network, and audio drivers.
Safety Warnings
Electrostatic Discharge (ESD) Warning: Motherboard components are highly sensitive to static electricity. Always wear an anti-static wrist strap or discharge static by touching a grounded metal surface before handling.
Electrical Safety: Always disconnect the computer's power cord from the wall outlet before assembling, disassembling, or adjusting any internal components. Never perform any operations while the system is powered on.
Cooling Requirement: A compatible and sufficiently performant CPU cooler must be installed. Powering on the system without a cooler installed will cause permanent damage to the CPU within seconds.
Compatibility Check: Before installation, always consult the motherboard's Qualified Vendor List (QVL) for memory and the compatible processor list on the MSI website to ensure full compatibility and stability of all components.
Battery Warning: The CMOS battery (CR2032) on the motherboard is a button cell. If swallowed, it can cause serious harm. Dispose of old batteries properly.
Sản phẩm liên quan